Showing posts with label christmas. Show all posts

11.25.2019

The Best Mini Gift Bag Ever!


This is my favorite gift bag ever!  It folds flat and uses only an 8" x 12" piece of Designer Series Paper!  I used the Brightly Gleaming Suite to create this bag designed my fellow demonstrator Teri Pocock.  Here is a template of the bag and a link to my video showing you how to create a diamond fold card, a suspension card, an ornament, and the mini gift bag!


Here is the template for the gift bag:

Place your order online using hostess code TJZVZNAP and you'll receive a free gift in the mail from me! (Make sure that you do not have "no contact" selected from previous online orders or I will not be able to send your gift).

Here are the products I used to create this gift bag - Click on the pictures to purchase:


Stampin' Up! Demonstrator

12.19.2015

Cup of Cheer Hot Chocolate Mugs


I made these Hot Chocolate Mugs with the Cup of Cheer stamp set for my daughter's dance class friends and girl scout friends.

I started with a piece of 4-1/2" x 11" card stock scored in half.  I used the Ovals Framelits to cut the top off and then saved it and used the next smaller oval to cut out the handle piece.

I added some froth with the Tree Builder Punch and some Shimmery White Paper.  What do you think?

Order these great products to create this project by clicking on the pictures below.

Click here to Order Stampin' Up! Online Anytime!!

10.21.2015

Lots of Joy Gift Card Holder


It's never too early to start making some Christmas card gift holders, right?  Use the Lots of Labels Fraemlits to create this darling gift card holder for all your gift card giving!

Start with a 2-3/4" x 11" piece of Real Red card stock and cut the top off using the Lot of Labels framelits die.  Then score at 3-1/2" and 7-1/2" from the straight end.  Emboss the bottom with the Lucky Stars Embossing Folder and adhere on sides.

Add a little 1" x 6" belly band of Merry Moments Designer Series Paper to hold your trees in place.  Enjoy!


Order these great products by clicking on the pictures below!


Click here to Order Stampin' Up! Online Anytime!!

12.17.2012

Christmas Fancy Favor Box


 I made these Christmas Fancy Favor boxes for my stamp club hostesses this month.  I used the Fancy Favor die and the Label Framelits and added a tag using the Delicate Doilies Sizzlit, Labels Framelit and Scallop Circle Punch (embossed with the Northern Flurry embossing folder).  I felt like I need a really wide ribbon so I used some retired Real Red ribbon to tie up the bag of mints inside.  I made two extras that I think I will give to some church ladies that I visit!

Click here to Shop Now!!

11.26.2012

We Believe in Santa Wall Art


I love this Wall Art project by Tara!  It's one of the great projects that you will find on Craft Project Central this month!  Just pop on over and subscribe to November to get the directions for this and many more great projects including my Wonderfall Card Box project!


Click here to Shop Now!!

12.02.2011

Christmas Gift Card Holder


'Tis the season for lovely gift card holders! I made this one with the Holly Berry Bouquet and the Pines & Poinsettias stamp set. I started with a 9-1/2" x 4" piece of crumb cake card stock and scored at 4" and 8" on the 9-1/2" side and then turned the card stock a quarter turn right and scored at 1-1/2".

I used the corner rounder on all the outside corners and decorated the inside of the gift card holder. I used the Slit punch to hold in a gift card.

To add the poinsettias on the front, I embossed some real red card stock with the Petals-a-Plenty embossing folder and then used the Boho Blossom punch to perfectly punch out the poinsettias. I added some dazzling details in the middle of each poinsettia and wrapped some early expresso quilted stain ribbon around to hold the gift card holder closed.


Here are the supplies that I used.  Place an order and receive a special FREE gift from me!


Supplies:
Stamps: Pines & Poinsettias, Many Merry Messages
Ink: Real Red, Chocolate Chip, Wild Wasabi
Paper: Crumb Cake, Real Red, Holly Berry Bouquet DSP
Petals-a-Plenty Embossing Folder
Early Espresso Quilted Satin Ribbon
Dazzling Details
corner rounder punch and retired slit punch
Boho Blossoms punch


Click here to Order Stampin' Up! Online Anytime!!


11.16.2011

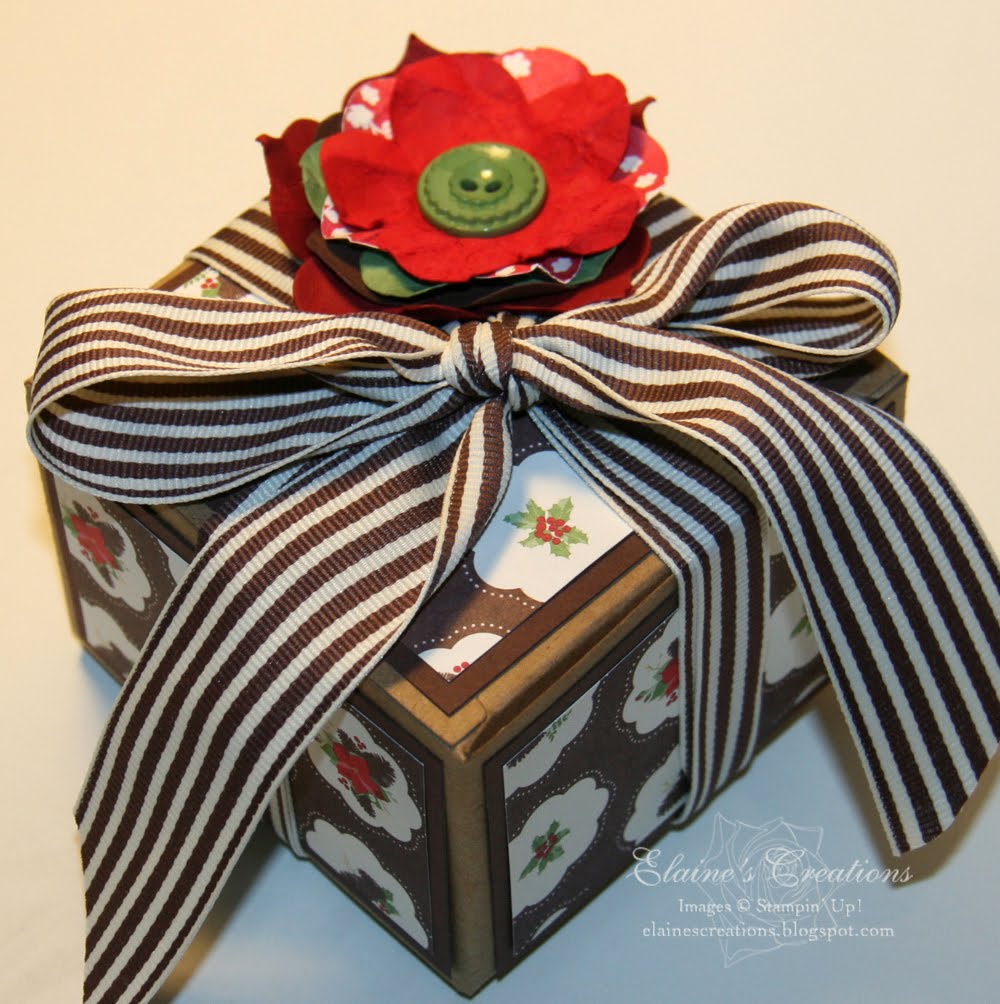
Decorated Christmas Kraft Box

I love the kraft boxes!!! They are so fun to decorate! I love how they will fit cookies, cards, jewelry, whatever you like! I simply used some Holly Berry Bouquet Designer Series Paper to dress up the box and the Fancy Flower Punch and Fun Flower die to create a flower for the top. I added some Chocolate Chip Striped Grosgrain ribbon to tie up the box. I made some cookies with the Sweet Pressed Cookie stamps and tucked them inside and gave them to my hostesses last month.


Supplies Used:
Kraft Box
Holly Berry Bouquet DSP
Fancy Flower Punch
Holly Berry Bouquet Button
Fun Flowers Bigz L Die
Retired 1-1/4" Striped Chocolate Chip Grosgrain Ribbon


7.20.2011

Christmas Pennant Parade Card


Here is a quick and easy Christmas card I made with the Pennant Parade stamp set! I love how versatile the stamp set is! I punched out the Trees and popped them up on dimensionals. I added the Merry Christmas sentiment from the Christmas Greetings stamp set.

12.24.2010

Tree Trimmings Top Note Box

Here is a beautiful box to put all kinds of fun presents in! I saw this box on Mary's blog. I used the Tree Trimming stamp set and cut out the ornaments. I used the En Francois background stamp and layered it on some Chocolate Chip and a Cherry Cobbler Scalloped Circle. I ran a piece of Always Artichoke Top Note through the Square Lattice embossing folder.

For the box I started with a 9" x 6" piece of Always Artichoke and scored it 1" from each side and then at 4" and 5" on the 9" side. I cut off the side pieces for the top of the box and then assembled the box and placed the top note die pieces on the top and bottom.

Click here to shop now!

12.22.2010

Christmas Cone Ornament


Here is a Christmas Cone Ornament that I made. I used a large dish to trace half a circle and then used the Contempo wheel to decorate the base. I added a border with the Dotted Scallop Ribbon punch and added some gold waffle paper inside. I curled thin strips of Jolly Holiday DSP and added them behind the ornament. It's ready to be filled with treats and hung on the tree!

Click here to shop now!

12.21.2010

Christmas Ornament Card


We made this Christmas ornament card at my last stamp club meeting. We started with two Cherry Cobbler Scallop Circles and added the flourish from the Baroque Motifs stamp set in Old Olive. We added a strip of Jolly Holiday DSP and some Dotted Ribbon Scallop Border punched edges. We stamped the Christmas tree and added a poinsettia made with the Boho Blossoms punch. We embossed a Round Tab punch with the Vintage Wallpaper embossing folder. Merry Christmas!!

Click here to shop now!

12.15.2010

Christmas Ghirardelli Chocolate Boxes

These cute boxes are perfect for tucking some Ghirardelli chocolates into and giving away as gifts! I used the Deck the Halls DSP and Bells & Bough stamp set to make these boxes. Here is the tutorial that I used to make them.


The Holiday Mini Catalog ends January 3rd, so don't miss out on all the fun products and order today!

12.09.2010

Got Merry Milk Cartons

I made these Mini Milk Cartons as gifts for my Stamp Club Members. I used the versatile Got Treats stamp set and the Ting Tags and Jewelry Tag Punch for the little tags. I wrapped some Jolly Holliday DSP around the milk cartons and a real red taffeta ribbon bow on top!

11.30.2010

Owl Reindeer and Santa Claus tags & FREE Gift Offer


I'm still havin' fun with the owl punch! This time I made some Reindeer and Santa Owls for my Christmas tags. I used Stampin' Up!'s exclusive Two Tags sizzix die and widened the hole with the slot punch to added some satin red and old olive ribbon. I used the Tags 'til Christmas stamp with the scalloped rectangle clear sizzix die.


Here is the reindeer owl close up.

And the Santa Owl. Only one day left in the Online Spectacular with 50% off My Digital Studio, Designer fabrics and much more!


Here are the supplies I used to make these cute tags!  Want to make your own?  Place an order and I will send you a tutorial with a FREE gift!


Click here to Order Stampin' Up! Online Anytime!!


11.10.2010

Perfect Christmas Punch

Here are two cards that I made with the Perfect Punches stamp set. I used the Joy at Christmas stamp that coordinates with the scallop punch. For the first card (inspired by this card here) I layered it on the large scallop circle punch and then on a piece of whisper white cardstock that I had embossed with the Poinsettia embossing folder. I used the swirl from Baroque Motifs in wild wasabi for the background and added some early expresso satin ribbon around the card.

For the second card I embossed the soft suede top note in the new Northern Flurry embossing folder and added some snowflakes from the Serene Snowflakes stamp set on the Poppy Parade cardstock. I added some Poppy Parade ribbon around the top note. I stamped the Joy at Christmas stamp on the Poppy Parade with soft suede and then again on very vanilla and punched them out with the scallop and circle punches to create the layers. Sweet and simple!

If you haven't already started, it's time to get going on your Christmas and holiday cards and there is plenty of time to order this and other great Christmas and holiday stamp sets from my store!