Showing posts with label ornament punch. Show all posts

11.18.2019

Christmas Gleaming Ornament Card


This is one of my swap cards from OnStage using the Christmas Gleaming Bundle.   I just can't get enough of this incredible bundle and suite.  I love how everything in the suite coordinates and makes it easy to make beautiful creations!


Place your order online using hostess code TJZVZNAP and you'll receive a free gift in the mail from me! (Make sure that you do not have "no contact" selected from previous online orders or I will not be able to send your gift).

Here are the products I used to create this card - Click on the pictures to purchase:


Stampin' Up! Demonstrator

9.25.2019

The NEW Hammered Embossing Folder!


I love the new hammered embossing folder!  It creates such cool dimension!  I used the copper foil with the hammered embossing folder to create this card.  I embossed and punched our the ornaments and then added some of the Merry Christmas ribbon!

Place your order online using hostess code THY9GPNX and you'll receive a free gift in the mail from me! (Make sure that you do not have "no contact" selected from previous online orders or I will not be able to send your gift).

Here are the products I used to create this card - Click on the pictures to purchase:


Stampin' Up! Demonstrator

9.23.2019

Christmas Gleaming Ornament Card


Get a head start on your Christmas cards with this quick and easy Christmas card using the Christmas Gleaming stamp set with coordinating ornament punches, yes two punches are in the bundle!  Stamp and punch out the ornaments and arrange on card to create this quick and easy Christmas card!

Place your order online using hostess code THY9GPNX and you'll receive a free gift in the mail from me! (Make sure that you do not have "no contact" selected from previous online orders or I will not be able to send your gift).

Here are the products I used to create this card - Click on the pictures to purchase:


Stampin' Up! Demonstrator

12.21.2013

Christmas Collectibles Card


I love simple Christmas cards!  I used the coordinating Christmas Collectibles and Christmas Ornament punch to create this card.


Supplies:
Christmas Collectibles & Joy to the World stamp set
Pool Party card stock
Islande Indigo, Pool Party ink
Northern Flurry embossing powder
Silver Ribbon


Click here to Shop Now!!

12.05.2012

Joyous Celebrations Ornament Card


These cards are straight copies from a cards I saw in Stampin' Up's Magazine, Stampin' Success.  I love all the inspirational cards and projects I see in each magazine!  These two really caught my eye with the fun color combination and lovely layouts.  One tip on the above card is the stamp off the Gumball Green tree to get a lighter shade and allow the sentiment to stand out.

Now I'm off to design my Christmas card with My Digital Studio!


Supplies:
Joyouse Celebrations stamp set
Gumball Green Core'dinations Card Stock
Crumb Cake, Gumball Green, Raspberry Ripple, Pool Party card stock
Crumb Cake, Gumball Green, Raspberry Ripple ink
Music Notes standard wheel
Holiday Frame and Framed Tulips Embossing Folder
Mixed Bouquet and Ornament Punch
Natural Buttons, Linen Thread


Click here to Shop Now!!

3.01.2010

Select Holiday Mini Catalog Products Still Available!


MINI PRODUCTS STILL AVAILABLE FOR PURCHASE

Check out these great Holiday Mini Catalog Products still available for purchase!!

Item # Description Price
116794Ornament punch$15.95
116806Champagne Mist Shimmer Paint$5.95
116854 Frost White Shimmer Paint$5.95
116807 Platinum Shimmer Paint$5.95
116829Décor Elements Blocks$9.95
116824 Stampin' Up! Textured Impressions Folder Petals-A-Plenty$7.95
116821Stampin' Up! Holiday Windows Magnetic Movers & Shapers $29.95
116819Stampin' Up! Table Setting Bigz XL die$42.95
116820Stampin' Up! Embosslits Merry die$11.95
116823Stampin' Up! Sizzlits Merry Details die$5.50
116822Stampin' Up! O Christmas Tree Pop-Up Bigz XL die$42.95
118140 Stampin' Up! Tree Decorations Sizzlits die$5.50
118108My Digital Studio$79.95
116519Charming stamp set $19.95

1.29.2010

Cupcake Box


Isn't this the most adorable cupcake box ever? My friend Donna helped us make these at our last demonstrator meeting. They are sooo fun!

To make the box, start with a 12" x 12" piece of cardstock and score 4" from each side. Cut a 2-1/8" circle in one of the sides for the window and place a window sheet behind the circle.

To create the insert, use a 6-1/2" x 6-1/2" piece of cardstock scored at 1-1/4" from each side. Use the Circle Scissor to cut a 2-1/8" circle in the middle.

To make the lid, use a 6-5/8" x 6-5/8" piece of cardstock and score a 1-1/4" from each side. Scallop and stamp edges.

You could also use the box to hold a glass ornament!


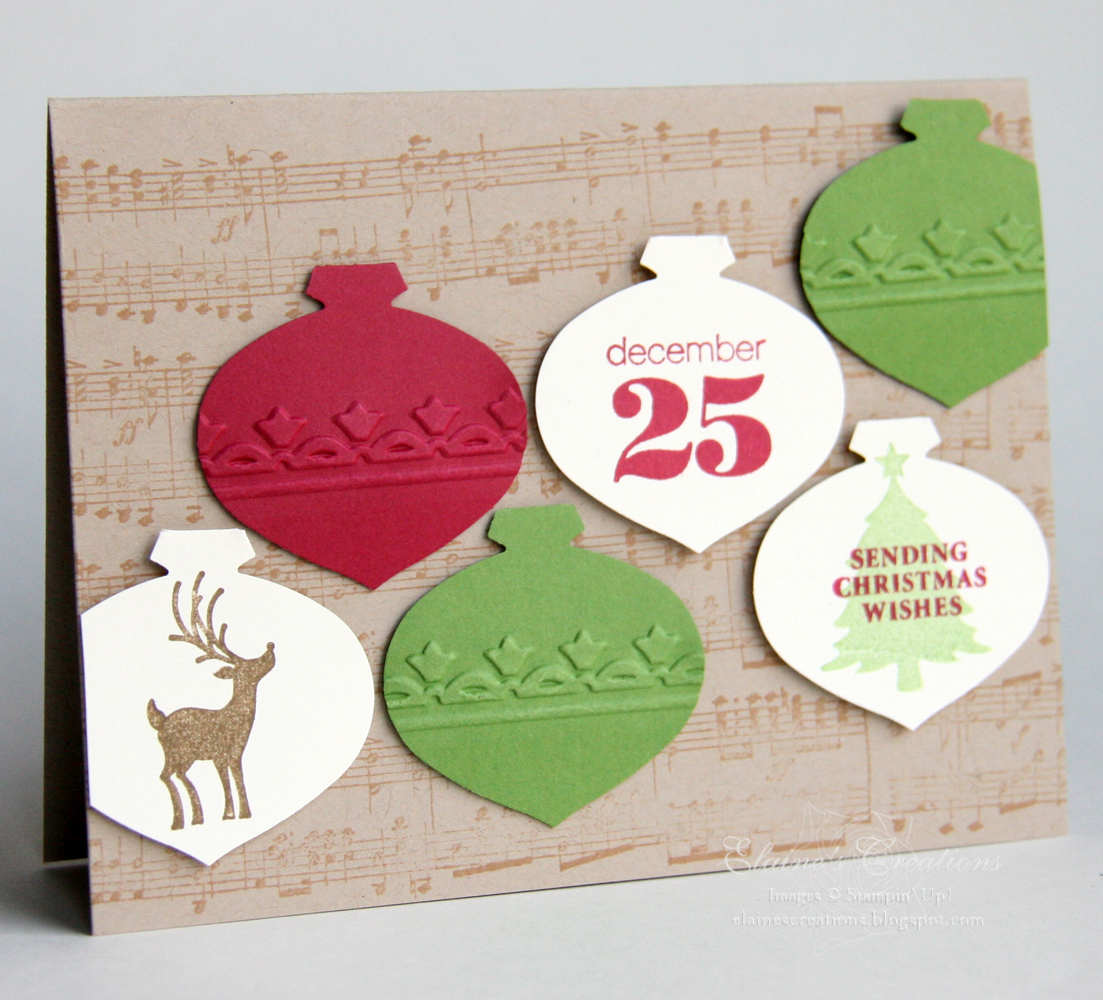
We also made this beautiful flower on top with the ornament punch! We punched out 5 flower petals, scored them in half and use a marker to curl them. We punched 3 leaves and scored them in the middle and curled them as well. Then we attached the flowers to the top of a 1" circle and the leaves to the bottom. We placed some circles and boho flowers (from the punch) in the middle with dimensionals in between each layer.


Recipe:
Stamps: Baroque Motifs, Friendship 24-7
Paper: Melon Mambo, Crushed Curry, Garden Green
Ink: Crushed Curry, Melon Mambo, Garden Green
Punches: Ornament, Boho Blossoms, Circle
Accessories: Circle Scissors, Window Sheets

11.20.2009

Snowflake Gift Card Box


At my stamp club last night, we this cute little snowflake box with three cards and envelopes to go inside. We started by making our own stencil with a 3x3 piece of a window sheet and the ornament punch. Then we swirled some bash blue ink with a sponge dauber onto the card using the ornament stencils we created. Then we stamped the medium snowflake from the Serene Snowflakes stamp set in silver with the stencil still in place.

Then we layered it on some bashful blue cardstock and punched a 1/16th circle in the top of the ornament and tied some silver elastic cord into a bow on the ornament. We used dimensionals to place it on a 3x6 piece of night of navy folded in half.

We stamped the greetings from Christmas Greeting inside the cards.

For the box we started with a 3-1/2" x 8'1/2" piece of Night of Navy and stamped the large and small snowflakes from the Serene Snowflakes stamp set all over the box. The box was scored and 3/4" across the bottom and at 3 -1/4", 4", 7-1/4", 8" lengthwise. Then the right hand corner was cut away and the bottom score lines were cut up to the 3/4" score line. We put it together with some sticky strip on the right 1/2" panel and then some on one of the bottom panels.


Don't forget to check out the Holiday Gift Giving Guide! When you purchase $50 of merchandise from the guide, you'll receive a free (up to a $16.95 value) decor element!


Here is a video tutorial I created on how to make your own stencil and some different ornament cards and tags: