I'm having so much fun with the new Wicked Cool stamp set! I saw some fun cards by Becky and was inspired to make my own. I love the witches legs! What a fun idea to make a pumpkin witch!
And I love using the bat punch! The Wicked Cool stamp set is perfect for all your Halloween decorating needs!
More Halloween projects to share! I saw this card somewhere (sorry!) and I loved the glitter on the edge of the circle and then layering it on the new large scallop punch and large circle punch! I sponged some whisper white on the spiderweb for added creepiness and some spiders on the old olive scalloped layer.
The Dark & Dreary stamp set that I used is in the Holiday Mini catalog along with lots of other fun Halloween items! Click here to shop now!
We made this cute Halloween Treat box at my last stamp club. We rubbed whisper white craft ink with a sponge dauber all over the embossed spiderweb, layered on some concord crush. We added the spider from the Dark and Dreary stamp set in the Holiday Mini catalog as well as the sentiment from seasonal sentiments layered on a pumpkin pie decorative label punch.
For the box, I started with a piece of 4-1/4" x 10-1/2" piece of pear pizzaz. I scored at 1-1/2" lengthwise and 1/2", 2", 5-1/2" and 7" widthwise. I added a 1/2" x 8-1/2" handle and attached with brads.
Stay tuned for more Halloween inspired cards and projects!
Isn't this a fun Haunted House? Here is where I found the great tutorial for it on Kay's blog. She cleverly uses the fancy favor box to create the house and the Square Lattice Embossing Folder for the roof! It was fun and easy to put together!
Stay tuned for more Halloween cards and gift ideas!
The new Candy Wrapper Sizzix die is awesome!! I used the Web wheel around the body of the candy wrapper and then sealed the side. Then I pressed in the middle of the scored "X" on the end of the wrapper to close the ends. I added a bat and spiderweb on one side and Got Treats from the new Got Treats? stamp set on the other side.
The Got Treats set coordinates perfectly with the Mini Milk Carton die as well!
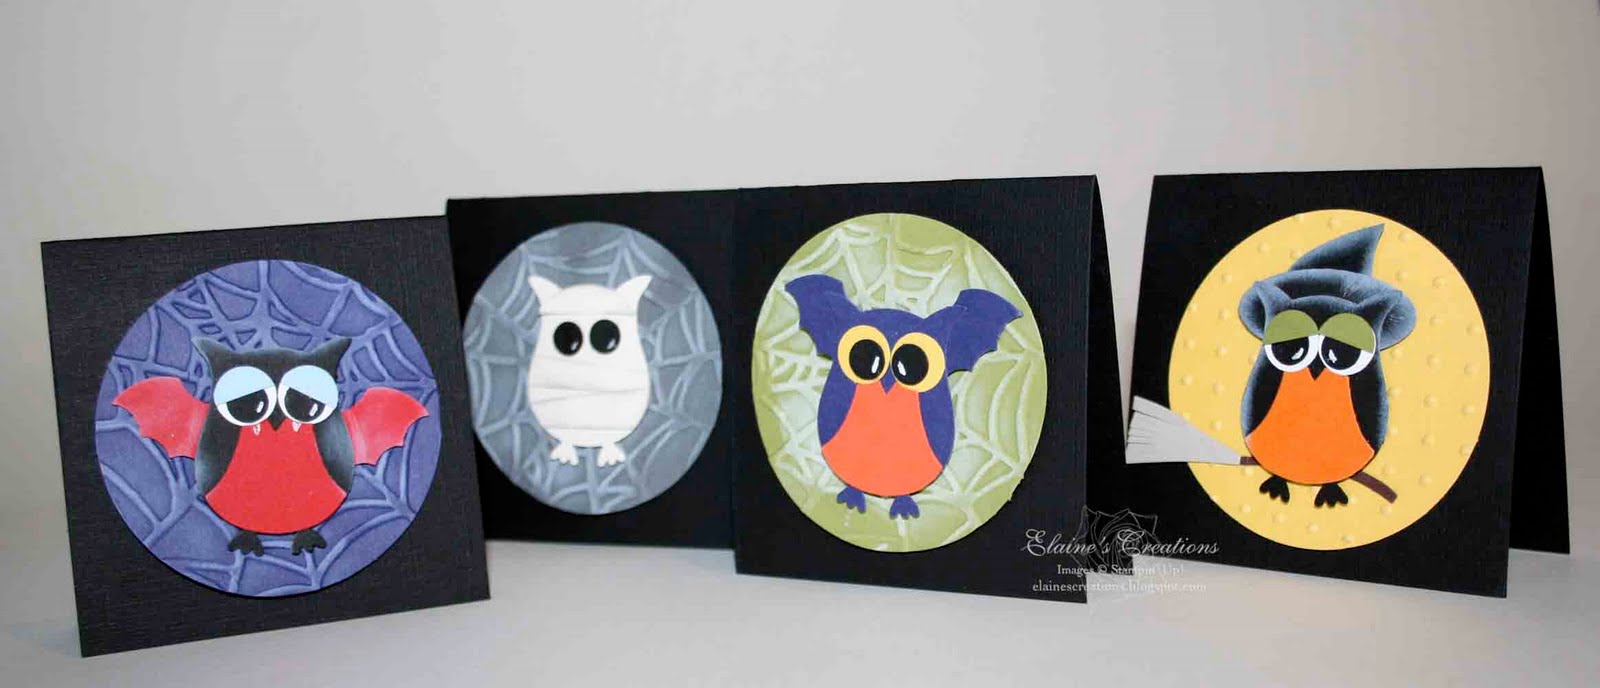
I saw these cute owls on Kay's blog and had to try making some! I'm totally hooked on the new Owl punch now after creating the vampire owl, mummy owl, bat owl, and sleepy witch owl.
I used the perfect polka dot embossing folder and the new 2-1/2" circle punch for the moon behind the witch. I used the oval punch and bird's wing from the bird punch for the hat and sponged them and the owl with whisper white. I used the branch from the bird punch for the broom stick.
For the bat owl, I used the bat punch and cut the image in half for the wings. I used the new SpiderWeb Embossing folder for the background and again punched it out with the 2-1/2" circle punch and used a sponge dauber and whisper white craft ink on the web.
The mummy owl was so fun. I cut strips of very vanilla and sponged them with basic gray. I used the same background for the mummy owl as the bat owl.
The vampire owl has a real red vest and wings and bashful blue eyelids. The background concord crush with some whisper white craft ink rubbed over the web.
The owl punch is such a versatile punch! Order now to receive yours in time to make all these fun Halloween owls!
My friend Donna told me to check out a new technique called Black Magic. I saw some samples and immediately wanted to try it! I decided to try chocolate chip instead of black and I like the result! I used the top note die and then stamped the grass and flowers from the Inspired by Nature stamp set with Whisper White Craft ink. Then I heat set them with my heat gun. Starting with the lightest color, I used my pure color pencils (you can use watercolor pencils instead) to color in the stamps.
I ran some River Rock through the Big Shot with the Square Lattice embossing folder and placed it on some Bravo Burgundy. I added some Daffodil Delight ribbon around the top note and the sentiment from the Afterthoughts Hostess set.
I was inspired by Shelli Gardner's project from one of her Workshop of a Lifetime Make-n-Takes and modified it to create these 3x3 cards and made a cute scalloped box to put them in. I used the Style Beautiful stamp set for the cards.
For the cards, I started by embossing the large stamp image with clear embossing powder and then using a sponge dauber to softly circle some baja breeze around the image. I stamped another swirl image in certainly celery on certainly celery and then stamped "Life is Beautiful" in early expresso on top and punched it out with the scallop oval punch. I added some early expresso taffeta ribbon and placed it on the card with a dimensional.
I stamped the third swirl image in baja breeze on the envelope and added the sentiment on top in early expresso.
For the scalloped box I started with a 6-1/4" x 6-1/4" piece of crumb cake and scored it at 3/4", 1-1/2", 4-3/4", & 5-1/2" on one side and 3/4", 4", and 4-3/4" on the other side. I have created a video tutorial to show you exactly how to assemble the box. I added a strip of 1/2" x 4" strip of baja breeze stamped with the individual Solid Stripes stamp in baja breeze to the top of the box.
Here is a video tutorial that I created to show you exactly how to put the box together and create the cool emboss resist effect on the cards. I have to apologize that it is hard to see the image in the video.
I made these simple thank you cards with the elegant Growing Green stamp set. I used certainly celery, crumb cake, baja breeze, and early expresso. They were quick and easy to create as handy gifts ready to go for whatever the occasion may be.

 I'm having so much fun with the new Wicked Cool stamp set! I saw some fun cards by Becky and was inspired to make my own. I love the witches legs! What a fun idea to make a pumpkin witch!